Access Control Import: Email Addresses
- Log on as the Administrator.
- Select Admin > Access Control Imports.
- Highlight the Import Users - Email Addresses option, and click the Select Files button.
- Specify the location on your workstation or network in which the Excel .csv import file for new groups resides.
- Select the correct location where the .csv import file resides. Only files with the filename extension “.csv”, which typically designates a comma-delimited file, are allowed for Access Control Import.
- When the correct file and location are selected, click the Open button on the Browse for Folder dialog. The Browse for Folder dialog is immediately closed, and the file in the selected folder with a filename extension of “.csv” appears in the file Upload dialog.
- To start the import of the selected file, click the Upload button. To cancel the import, click the Clear List button.
- The data from the selected file is imported into Access Control in a single operation which does not require your intervention. When the import is complete, the Users Email results appear, and the data from the import file and the import status of each record appear.
- Click the Continue button to end the import process and return to the Access Control Imports screen.
Import Users - Email Addresses Data Examples
The following is an example of seven rows containing user email address information:
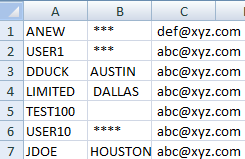
- The first element (Column A) is the User Login ID.
- The second element (Column B) is the User Location.
- The third element (Column C) should be the user’s email address.
RS Resources/exp_imports_8.htm/TY2021
Last Modified: 06/30/2020
Last System Build: 09/25/2022
©2021-2022 Thomson Reuters/Tax & Accounting.
