Access Control Import: Import New Users
Downloading the XML Template Example/Creating a New XML Template
The format for importing new users into Admin > Access Control Imports > Import New Users is through an XML template.
You can download the Import New Users XML templates using the Download Template link at the bottom of the Import New Users screen in the Access Control Imports menu (see the link circled in red below).
CSV template downloads are here also for the other Access Control Import Types.
To download and create the XML templates, do the following steps:
- Click the Download Template hyperlink.
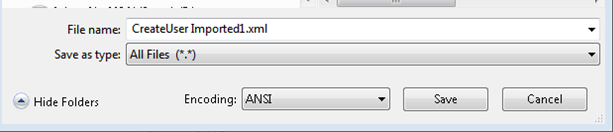
- When prompted, enter a name for your XML file.
- Make sure the file type is still XML
- Click Save. Make sure the drive and path is where you want your import XML template to go.
After you save the downloaded template, you can edit your template.
Editing the Template Example
To edit the import information in your XML file, you will need to change the XML template into an editable format. To do this, go to the drive and path where you saved and renamed the XML, and right-click the XML name. Select Edit.

By default, the file opens in Notepad. If you select another TXT format, open the XML using the Open With option.
When the XML import template opens in a TXT format, it will display the information ready to be edited.
Editing the Template Attributes
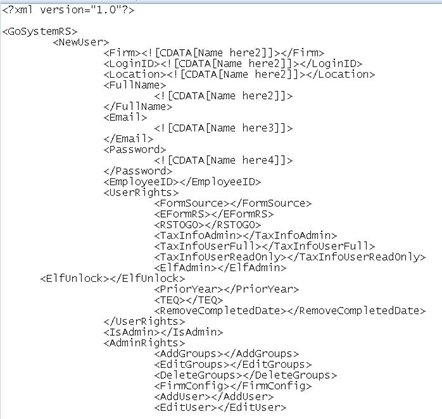
Below are the variables that you can edit based upon each user’s ID options, information, rights and assignment requirements, etc.
The specific variables with descriptions that can be edited are highlighted in bold below.
<?xml version="1.0"?>
<GoSystemRS>
<NewUser>
<Firm><![CDATA[Firm Name]]></Firm>
<LoginID><![CDATA[User Login ID]]></LoginID>
<Location><![CDATA[Location]]></Location>
<FullName><![CDATA[User's Full Name]]></FullName>
<Email><![CDATA[User email address]]></Email>
<Password><![CDATA[Login Password]]></Password>
<EmployeeID>User's Employee ID</EmployeeID>
<UserRights>
<FormSource>Y or N</FormSource>
<EFormRS>Y or N</EFormRS>
<TaxInfoAdmin>Y or N</TaxInfoAdmin>
<TaxInfoUserFull>Y or N</TaxInfoUserFull>
<TaxInfoUserReadOnly>Y or N</TaxInfoUserReadOnly>
<ElfAdmin>Y or N</ElfAdmin>
<ElfUnlock>Y or N</ElfUnlock>
<PriorYear>Y or N</PriorYear>
<TEQ>Y or N</TEQ>
<RemoveCompletedDate>Y or N</RemoveCompletedDate>
</UserRights>
<IsAdmin>Y or N</IsAdmin>
<AdminRights>
<AddGroups>Y or N</AddGroups>
<EditGroups>Y or N</EditGroups>
<DeleteGroups>Y or N</DeleteGroups>
<FirmConfig>Y or N</FirmConfig>
<AddUser>Y or N</AddUser>
<EditUser>Y or N</EditUser>
<DeleteUser>Y or N</DeleteUser>
<Transfer>Y or N</Transfer>
<CreateAdmin>Y or N</CreateAdmin>
<GroupImport>Y or N</GroupImport>
<FreeReturns>Y or N</FreeReturns>
<Defederate>Y or N</Defederate>
</AdminRights>
<Groups>
<GroupCenter>
<Name><![CDATA[Location]]></Name>
<AssignedGroups>
<GroupName><![CDATA[Group Name]]><GroupName>
</AssignedGroups>
</GroupCenter>
</Groups>
</NewUser>
</GoSystemRS>
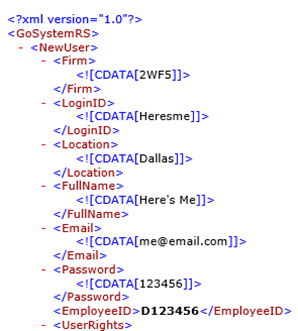
Here is an example of a completed TXT template ready to be saved as an XML for import (with the attributes bolded for demonstration purposes only).
<?xml version="1.0"?>
<GoSystemRS>
<NewUser>
<Firm><![CDATA[2WF5]]></Firm>
<LoginID><![CDATA[Heresme]]></LoginID>
<Location><![CDATA[Dallas]]></Location>
<FullName><![CDATA[Here's Me]]></FullName>
<Email><![CDATA[me@email.com]]></Email>
<Password><![CDATA[123456]]></Password>
<EmployeeID>D123456</EmployeeID>
<UserRights>
<FormSource>Y</FormSource>
<EFormRS>Y</EFormRS>
<TaxInfoAdmin>Y</TaxInfoAdmin>
<TaxInfoUserFull>Y</TaxInfoUserFull>
<TaxInfoUserReadOnly>Y</TaxInfoUserReadOnly>
<ElfAdmin>Y</ElfAdmin>
<ElfUnlock>Y</ElfUnlock>
<PriorYear>Y</PriorYear>
<TEQ>Y</TEQ>
<RemoveCompletedDate>Y</RemoveCompletedDate>
</UserRights>
<IsAdmin>Y</IsAdmin>
<AdminRights>
<AddGroups>Y</AddGroups>
<EditGroups>Y</EditGroups>
<DeleteGroups>Y</DeleteGroups>
<FirmConfig>Y</FirmConfig>
<AddUser>Y</AddUser>
<EditUser>Y</EditUser>
<DeleteUser>Y</DeleteUser>
<Transfer>Y</Transfer>
<CreateAdmin>Y</CreateAdmin>
<GroupImport>Y</GroupImport>
<FreeReturns>Y</FreeReturns>
<Defederate>Y</Defederate>
</AdminRights>
<Groups>
<GroupCenter>
<Name><![CDATA[Dallas]]></Name>
<AssignedGroups>
<GroupName><![CDATA[Dallas1]]></GroupName>
</AssignedGroups>
</GroupCenter>
</Groups>
</NewUser>
</GoSystemRS>
You can now import more than one new user at a time through XML import. To do this within the TXT template, copy and paste the initial user’s information (from the beginning New User tag to the ending New User tag) and edit each of the subsequent users information based on each user’s profile.
Saving the TXT Template to the XML Format
Once your TXT template is correct for the user(s) you want to import, you will need to save the template to an XML file. To do this, do the following:
- Right-click the TXT document and choose File > Save As.
- Make sure the drive and path point to the correct location where you want the XML template saved.
- Give the file a name followed by the .XML extension.
- In the Save as Type drop-down option field, choose All Files (*.*).
- Click Save.
- To verify that the template has been saved as an XML file ready for importing, right-click the XML file you just saved and select Open.

- An XML document will display with the same data as in the TXT form.
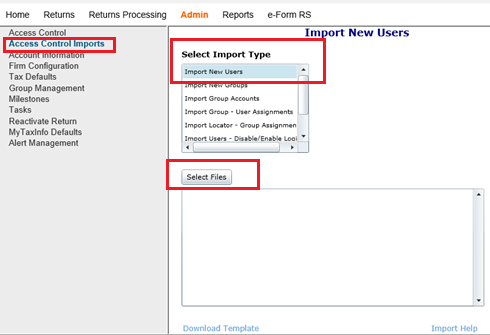
Importing into Users into Admin > Access Control Imports
- Select Admin > Access Control Imports.
- Highlight Import New Users.
- In the Select Files option, find the XML for the user you want to create.
- Populate the File Name field, making sure that the file type is XML (*.xml).

- Select Open.
- Your XML template will appear in the Import New User Select Files dialog.
- When the correct import template appears in the import dialog, select Import.
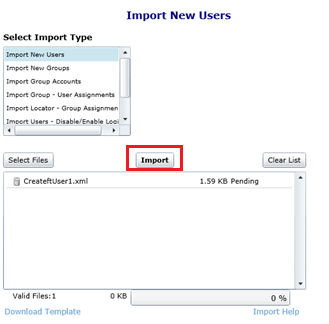
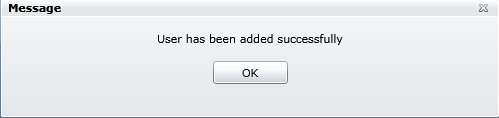
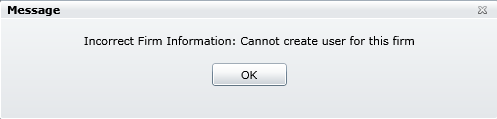
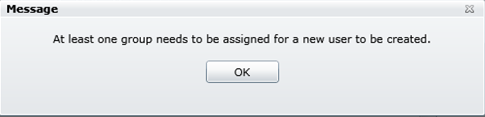
- If the template is correct, the following message will appear:
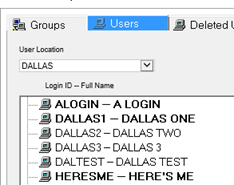
- Below are the results of the XML import using the information for user Here’s Me:
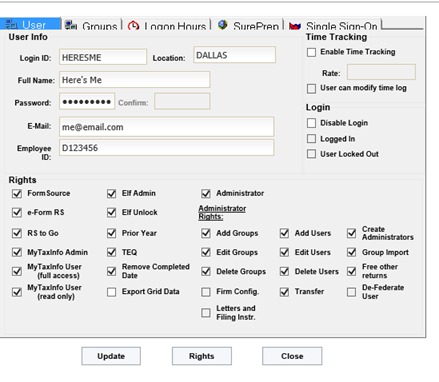
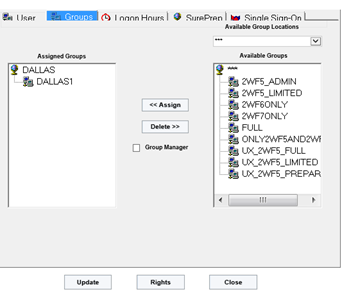
- Below are the results on the Groups tab for the Here’s Me user:
If Errors Occur...
If you need to correct your template, error messages generated during the import process will give you information about the necessary changes to your XML file.
To correct the errors, follow the same steps as above:
- Open the XML file.
- Edit the TXT file.
- Save as an XML file.
- Import the XML file again.
RS Resources/exp_imports_2.htm/TY2021
Last Modified: 03/19/2020
Last System Build: 09/25/2022
©2021-2022 Thomson Reuters/Tax & Accounting.
