Creating Users
The first users that should be created are other Firm Administrators in the *** Location. This ensures that there is a backup *** Administrator login.
Firm Configuration, a right available under Administrator Rights, allows access and edit of Firm Configuration options. The Firm Configuration right may be selected for Administrators in the *** Location only.
The figure below shows the rights that are automatically granted when you select the Administrator check box. When you set up new *** Administrators, the Firm Configuration and Letters and Filing Instructions rights along with the De-Federate User right will NOT be automatically enabled when you select the Administrator check box. If these rights should be granted, you must select them separately.
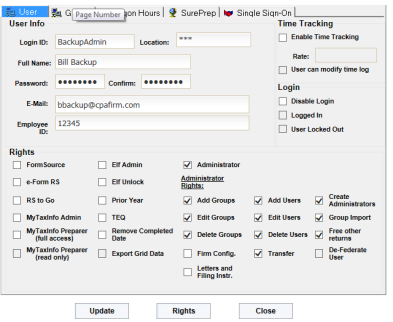
The Firm Configuration right will be enabled for any existing Administrators in the *** location. The primary *** Firm Administrator should remove the right as necessary to ensure that Firm Configuration changes are only made by appropriately authorized *** Administrators.
The next users that should be created are location administrators. This allows them to log in and create their own groups and users.
- To create a new user, click the Users tab. This displays the screen shown below.
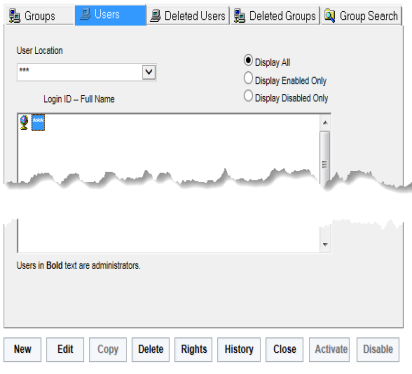
- Users are grouped by location. Select the location in the drop-down arrow box to display the users in a group.
- Click New. The screen where you create new users appears.
- Enter the user’s login ID.
Only the firm administrator can specify a new location when creating new users.
Login IDs with a location of *** and who also have the administrator right are considered to be firm or regional administrators.
Regional administrators may be assigned to multiple locations and will be able to create new users in any of their assigned locations.
Login IDs with locations other than “***” and the administrator right are considered to be location administrators.
- Enter the user’s full name, password, email address, and Employee ID. Enter the password twice to verify its accuracy.
- If the user should log time, check the Enable Time Tracking check box and fill in the appropriate hourly rate.
- Check the box if the user is allowed to modify the time log.
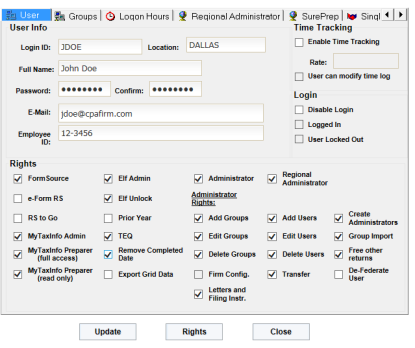
- In this example, the firm administrator is creating a login ID for JDOE, a location administrator in DALLAS. In the Rights section in the lower half of the User tab, check the Administrator check box, if the user is to be an administrator.
Making a user an administrator enables the Access Control menu option for that user. - By default, all administrator rights are enabled when the Administrator check box is selected. You may remove any rights if you wish to restrict what this administrator can do within Access Control. For example, if you want the administrator to be able to add or edit groups, but you do not want the administrator to be able to delete groups, remove the Delete Groups right.
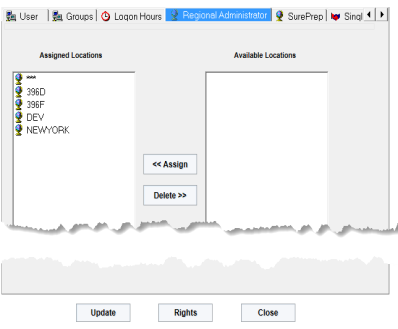
- If you wish to make this user a regional administrator, one who can modify groups and users in multiple locations (but not all locations), check the Regional Administrator check box, and then click the Regional Administrator tab. Select the locations that the regional administrator can modify, and then click Assign.
- Additional products may appear in the Rights section of the User tab. These rights must be granted to each user instead of through groups, since the number of users authorized to access these products or functions may differ from the number of users that can be created in Access Control. User rights control whether the user can execute one of these products or functions.
- Before clicking the Update button, you must click the Groups tab, as shown below, to make the JDoe login ID a member of at least one group.
A user may belong to multiple groups. If one group grants full access to an account and another group grants Limited or Preparer access to the same account, the user has full access to the account.
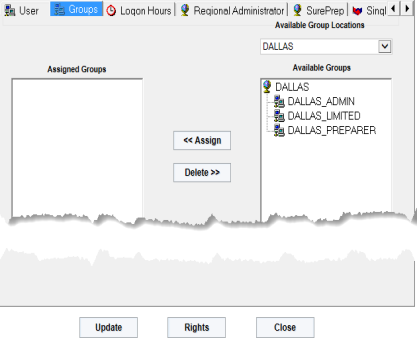
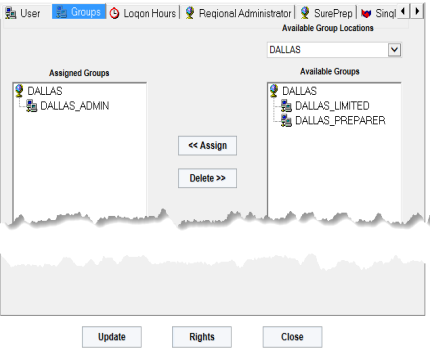
- On the Groups tab shown above, first select DALLAS, one of the Available Group Locations. Making that selection displays a list of Available Groups. Click the group named DALLAS_ADMIN in the Available Groups column. Click Assign to make the JDoe login ID a member of this group.
If a user is assigned to only one Group, then the user cannot be deleted unless assigned to another Group. Conversely, if a Group has only one user, then the Group cannot be deleted until another user is assigned to that Group.
- Click Update once you have assigned the user to a group on the Groups tab and checked the appropriate product and function rights on the User tab.
- You may use the Rights button to verify that the rights of an existing user are set correctly. Selecting the Rights button displays a screen showing the Login ID, Location, current login status of the user, the date and time the user last logged in, as well as user rights and effective account rights. The Rights screen shows the various accounts the user may access and the access levels of Full, Limited, or Preparer for each of those accounts. The seven group rights that are granted as part of the group setup process and Group Membership are also displayed.
- Two useful options available to administrators are found on other menus:
- The Admin > Account Information option shows groups that grant access to specific accounts.
- The Reports > List Users report also shows users’ rights.
RS Resources/exp_groups_users_5.htm/TY2021
Last Modified: 03/19/2020
Last System Build: 09/25/2022
©2021-2022 Thomson Reuters/Tax & Accounting.
